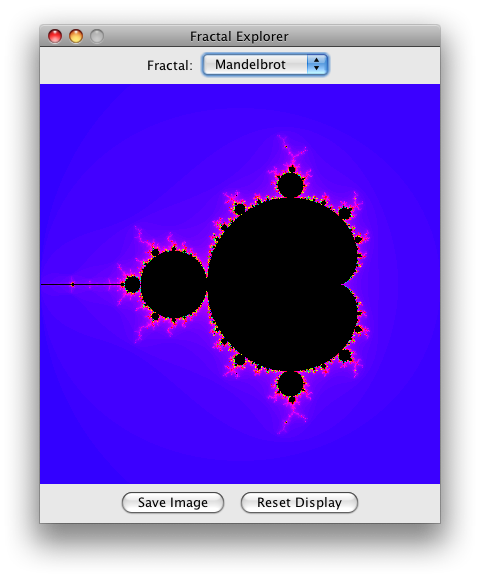
This week you will extend your Fractal Explorer with two new features. First, you will add support for multiple fractals, and allow the user to select which fractal to display via a dropdown combo-box. Second, you will add support for saving the current fractal image into a data file. Here is a screenshot of what your new program will look like:
The top of the Fractal Explorer now includes two widgets to let the user select a fractal, and the bottom includes a new "Save" button to save the current fractal image.
Since there will now be multiple action-event sources, you can practice handling all of these sources with a single ActionListener implementation in your class.
It is very easy to add multiple fractals to your Fractal Explorer, particularly because we introduced the FractalGenerator abstraction in our initial implementation. This week you will add support for multiple fractals, and the user can choose between them using a combo-box. This is a very common "UI metaphor" (i.e. an interaction style that users are already familiar with from many different user interfaces), so it should be very easy for people to understand. The Swing API provides combo-boxes via the javax.swing.JComboBox class, and better yet, it fires ActionEvents when a new item is selected. Here is what you need to do:
Create two new FractalGenerator implementations.
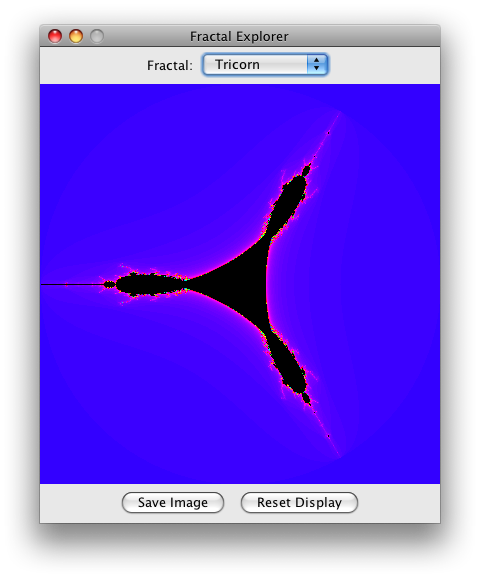
The first will be the tricorn fractal, and should go in a file Tricorn.java. As before, you should subclass FractalGenerator, and the implementation will be very nearly identical to the Mandelbrot fractal, except for two changes. In fact, you might even copy the Mandelbrot source code, and just make the following tweaks.
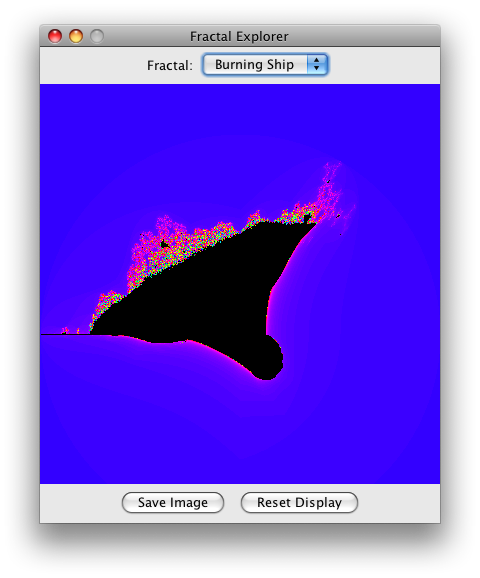
The second fractal to implement is the "Burning Ship" fractal, which does in fact look very similar to a burning ship. The details are as follows:
It is very easy to set up a JComboBox in your user interface. You can use the no-argument constructor, and then use the addItem(Object) method to add each of your FractalGenerator implementations. As stated in the previous step, the combo-box will use the toString() method on your implementations to display the generators in the combo-box.
You should also put a label into your user interface, before the combo-box, to explain what the combo-box is for. You can do this by creating a new JPanel object, adding a JLabel object and a JComboBox object to it, and then putting the panel into your frame at the NORTH position in the frame's layout.
Finally, you need to add support for your combo-box to your ActionListener implementation. You can check whether the combo-box is the source of the action-event, and if it is, you can retrieve the currently selected item from the widget and set it to be the current fractal generator. (You can use the getSelectedItem() method for this.) Don't forget to reset the initial range and redraw the fractal!
So that you can verify your work, here are the initial images for the Tricorn and Burning Ship fractals:
Your other task for this week is to save the current fractal image to disk. This might sound like a daunting task, but the Java API provides several tools to make this very straightforward to implement.
The first thing you need to do to add this feature is to add a "Save Image" button to your display. You can put both the Save and Reset buttons into a new JPanel, and then put this panel in the SOUTH region of the frame, similar to the way you added the label and combo-box. (Note: Don't accidentally use the same panel object in both places, or you will get very strange results!)
The Save button will also need to have its action-events handled by your ActionListener implementation. You should give your Save and Reset buttons each their own action-command value (e.g. "save" and "reset"), so that the action-handler can distinguish between the two buttons.
In your "Save button" handler, you need to allow the user to specify what file they are going to save the image into! You can do this with the javax.swing.JFileChooser class, which makes it very easy. This class provides a method showSaveDialog(), which pops up a "Save file" dialog allowing the user to select what directory and file to save to. The method takes a graphics Component that is the parent of the chooser; this simply allows the chooser to be centered with respect to its parent. Use the application's frame as the parent.
You will also notice that this method returns an int value, specifying the outcome of the file-selection operation. If the method returns JFileChooser.APPROVE_OPTION then you can go ahead with the file-save operation; otherwise, the user has canceled the request, so just return. If the user did select a place to save the file, it is available via the getSelectedFile() method, as a File object.
You will also want to set up the file chooser to only save PNG images; that is the only format you will support for now. You can do this with the javax.swing.filechooser.FileNameExtensionFilter, with a snippet of code like this:
  JFileChooser chooser = new JFileChooser();
  FileFilter filter = new FileNameExtensionFilter("PNG Images", "png");
  chooser.setFileFilter(filter);
  chooser.setAcceptAllFileFilterUsed(false);
The final line ensures that the chooser won't allow non-".png" filenames to be used.
If the user has successfully selected a file, the next step is to save the fractal image to disk! This would also be very complicated, except that again Java already includes this functionality. The javax.imageio.ImageIO class provides simple image loading and storage operations; you can use the write(RenderedImage im, String formatName, File output) version. The format will be "png". The "RenderedImage" is simply the BufferedImage instance from your JImageDisplay component. (You will need to provide a public accessor for this member.)
Of course, you will also notice that the write() method might throw an exception, so you need to wrap this call in a try/catch block and handle the potential error. Your catch block should inform the user of the error using a dialog window. Again, Swing provides the javax.swing.JOptionPane class to simplify the process of creating informational dialogs, or getting yes/no input. In this case, you can use the JOptionPane.showMessageDialog(Component parent, Object message, String title, int messageType) static method, with a message-type of JOptionPane.ERROR_MESSAGE. Your error message can be what the exception returns from its getMessage() method, and the title can be something descriptive like "Cannot Save Image". As before, the parent component should be the frame, so that the error dialog is properly centered within the frame.
Once you are done with these features, give them a try! You should now be able to explore the various fractals and see them in all their beauty, and you should also be able to save the images of what you see to disk. You can also try out your error-handling code by trying to save an image to a file that already exists but is read-only, or perhaps to a read-only drive like a CD. Or, you can try saving to a file whose name is actually a directory in the target folder.
Once you are convinced that everything works, submit your files to csman.